 Skip to content
Pin Size Planning
What Size Should Custom Light-Up Pins Be
The right custom light-up pin size is the smallest wearable size that still gives the logo a clear shape, leaves room for the LEDs, and feels comfortable on the shirt, jacket, badge strap, bag, or event outfit where people will actually wear it.

Start With Wearability, Not a Random Dimension

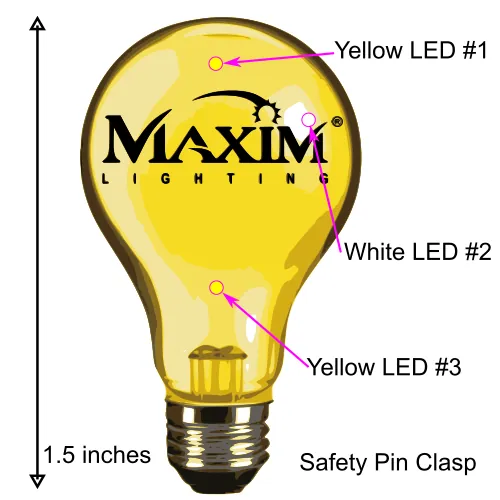
A custom light-up pin has to do more than fit the artwork. It has to sit well on clothing, stay visible in the event setting, and leave enough room for the battery and LEDs behind the printed face.
For a trade show booth, a pin may need to catch attention from a few steps away. For a donor gala, school event, staff uniform, or recognition dinner, the same oversized look may feel too bulky. The quote should balance visibility with comfort.
Use the Logo Shape to Set the First Size Range
A wide wordmark, tall mascot, round seal, product outline, shield, ribbon, or building shape will not behave the same way at the same inch measurement. One design may need more width, while another needs extra height so the main symbol does not look squeezed.
When you send artwork, include the detail that must stay recognizable. That may be a mascot face, sponsor name, city landmark, product silhouette, campaign ribbon, or event year. The sizing conversation can then protect the most important read before trimming anything else.
Small Text Is Usually the First Warning Sign
If the logo includes a tagline, long chapter name, sponsor list, department name, or fine border type, pin size becomes a readability decision. Bigger can help, but tiny lettering still may not be practical if the piece needs to stay comfortable and affordable.
A stronger answer is often to keep the main logo, simplify the smallest words, move secondary details to packaging or event signage, and let the LEDs emphasize one memorable feature instead of trying to preserve every printed element.
Size, Lights, and Clasp Choice Should Be Planned Together
| Decision | What It Changes | Question to Answer Before Quoting |
|---|---|---|
| Outside shape | Controls the usable face area for logo detail. | Does the pin need to follow the logo outline or fit a cleaner badge shape? |
| LED location | Needs physical space behind the artwork. | Which one or two features should flash, glow, or draw the eye first? |
| Printed detail | Sets the smallest practical size for readability. | Which text or symbol must be readable when worn? |
| Clasp style | Affects comfort, weight distribution, and garment use. | Will people wear the pin on shirts, jackets, lanyards, bags, uniforms, or formal outfits? |
| Quantity and packing | Can affect unit cost, handling, and shipping planning. | Do you need one size for everyone or separate versions for VIPs, staff, or sponsors? |
A Bigger Pin Is Not Automatically a Better Pin
The most effective size is usually the point where the logo is clear, the lights have a reason to be there, and the finished piece still feels easy to wear. Oversizing a crowded design can make the pin expensive or awkward without fixing the underlying artwork problem.
Match the Size to the Event Role
Staff identification, sponsor visibility, donor appreciation, school spirit, parade volunteers, and booth giveaways all put different pressure on size. A staff pin may need to be visible across a room. A donor keepsake may need to feel polished on a jacket. A student event pin may need to survive active wear.
Tell LogoBlinkee whether the pin is being worn by employees, guests, students, volunteers, sponsors, performers, booth visitors, VIPs, or donors. That context helps decide whether the design should lean compact, bold, formal, or highly visible.
Use Finished Examples to Calibrate Your Eye
Looking at finished pins can quickly show whether your artwork belongs in a compact shape, a wide sign-style layout, a tall mascot outline, or a simple emblem. The LogoBlinkee portfolio is useful because the examples show different shapes, color blocks, and light positions in finished form.
If you are still choosing the light-up feature, compare the LED count planning article. If the logo has fine detail, the logo detail article can help decide what to simplify before choosing a size.
Ask for Two Size Options When the Artwork Is Close
If the design could work at two sizes, ask for the tradeoff instead of guessing. A smaller version may be easier to wear and distribute, while a larger version may protect a mascot face, product shape, landmark, or sponsor name.
This is especially helpful when the order has a firm event date. Pair the size question with quantity, deadline, LED plan, and clasp preference so the quote can show the practical difference instead of treating size as an isolated choice.
Send Size Notes With the Artwork File
A useful request can be simple: “We want this shield-shaped logo to stay readable on jackets, the star should blink, the sponsor name can be simplified if needed, and we would like pricing for a compact version and a larger staff version.” That gives the proof and quote a real decision to solve.
For artwork prep, use the custom light-up pin artwork checklist. For attachment decisions, compare safety pin, military clutch, and magnet options before the first proof.
Price the Size That Fits the Logo and the Wearer
Send the logo, preferred size range, must-read details, LED idea, quantity, deadline, and wearer setting. LogoBlinkee can help compare sizing choices before the design moves into proofing.
Request Size and Quote Guidance
Try a Rough Shape in the Blinky Builder
Size Questions Before a Custom Light-Up Pin Quote
What is a good size for a custom light-up pin?
A good custom light-up pin size is large enough for the logo, LED location, and clasp to work together without making the pin awkward to wear. The right size depends on the artwork shape, small text, number of lights, and where people will wear it.
Should I make the pin bigger so the logo is easier to read?
Sometimes, but simplification often matters more than size alone. A cleaner shape, fewer tiny details, stronger contrast, and one clear light-up feature can make a smaller pin read better than a crowded larger one.
Does pin size affect the custom light-up pin quote?
Pin size can affect material use, hardware planning, packaging, proof decisions, and shipping weight. Quantity, LED count, clasp choice, artwork complexity, and deadline also shape the final quote.
What size notes should I send with a quote request?
Send the preferred width or height if you have one, the place where the pin will be worn, the detail that must stay readable, the light-up idea, quantity, event date, in-hands date, and clasp preference.